Pages

Monday, November 24, 2014

Christmas Decorations

A couple projects I have been working on to get ready for Christmas.

I finished these trees today. The bases are foam tree forms from the Dollar Tree. Everything else was stuff I already had. I used paper cut in small triangles and glued on with hot glue. Topped one with a bow and put in a small pot wrapped with ribbon. The stick is a bbq skewer wrapped with tinsel trim. The other is topped with a star sticker. The base is a mini storage cup also wrapped with tinsel trim.


The wreaths are ones I have been making over the past two weeks. I learned how to do this from a video by Sylvia Tabor. Some are gifts, but at least one will be for us. I probably will make at least two more before I decide who gets what. 


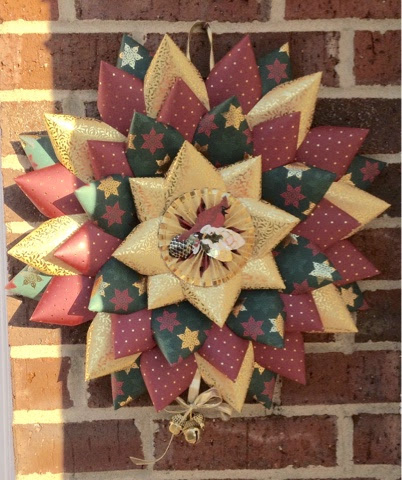
Or maybe I'll just keep them all!

Thanks for looking.
Cathy

Tuesday, November 4, 2014

#KSDNOV Alter Something!

The November challenge over at the Kraaft Shaak (a great kommunity over on Google +) is to alter something.

I was sitting in my craft room trying to think of what I could do when I saw this.
 
This has been hanging in my room just like this for at least 2 years. It's a Puffs tissue box. Already quite beautiful, I had pulled the top up to make a hanger for it, stuck some wood excelsior in it for a nest, then promptly forgot about it. So I decided it was about time to finish this project.

This picture shows the back of the box as well as some other items I thought I would use.


Here is the side of the box. I needed to cover the logo so I stuck flowers on top. The green flourish started out as silver like the ones you see in the bottom corner. I covered the silver flourish with green glitter to make it match the box.


Can you see the mistake I made here? There is a lump of hot glue where I had originally put the outer bird. When I put the branch on I decided I would rather have the bird perched on the branch.


Here you can see the completed project. I have glued some more flowers on the box to cover that hot glue mess. I really like the way this turned out, and that it was pretty enough that I didn't need to add too much to make it look great!
 
Thanks for looking!
Cathy 

Saturday, November 1, 2014

Stamp Carving

This past week I won a stamp carving kit from Heather over at the Kraaft Shaak.


 I had to start playing today but I was afraid to cut into the stamp material and mess it up. Fortunately, during the weekly live show Sandra (go visit her - she's doing a week long stamp carving series!) showed that you can also use erasers to carve. Off to the dollar store I went!


First cuts
I started with a simple shape on some small round erasers. I had drawn some candy monsters earlier this week based on Marie Browning's post on the Tombow Blog that seemed simple. The biggest problem was how small the parts were. I wanted this to be flexible and interchangeable, so I did all the body parts separately. 


Cleaning up


I enjoyed doing these a lot. I know I need to refine my skills but I was pretty happy with my first time ever stamp carving.


Finished stamps


Special thanks to Heather, Sandra, Tina, and Marie for the products, information, and inspiration.


Thanks for looking!
Cathy